
Most Chromebooks are supported for 5 years. You may have used your Chromebook faithfully for many years and suddenly, one day, you receive a notice that your technical partner is no longer supported. Your Chromebook has reached the end of life (EOL) and will no longer receive updates. No updates means your Chromebook is a security risk. Bye, bye Chromebook, time for the recycle bin.
But what if there were another way? Most Chromebooks have soldered on components – not upgradeable in any way. But some older units have at least one upgradeable part, the hard drive or SSD storage that contains the Chrome operating system. Is it possible to put Linux on an old Chromebook and extend the life of the hardware? The answer is: Yes!
My search for a suitable replacement for my Chromebook started with Googling: “Chromebooks that are upgradeable.” I found a very small list of Chromebooks. Some of them are the Acer C720 and C740 models. The C720 is definitely EOL. Some come with 2 gigabytes (GB) of memory, but 4 GB is best. The Acer C740 is on the cusp of EOL – maybe another year. I found a 4 GB model on eBay for $50 with free shipping. Granted it was not in pristine condition, but the company put covers on the lid and palm rest area; the rest of the hardware was in great shape. I found an old review of the C740 here: https://www.androidcentral.com/acer-c740-chromebook-review
The next thing is to upgrade the SSD. Most Chromebooks still come with 16GB of storage for the Chrome OS, not a lot of extra space for files because Google expects you to store files on SD cards or in the cloud. But I wanted to expand the internal storage to 128GB. I found this incredibly small card on Amazon for $25: Here’s the id: KingSpec M.2 SSD 2242 NGFF 128GB Internal Solid State Drive SATA 6Gb/s.

Next steps involve putting the Chromebook in Developer mode which allows modification of the ChromeOS. A good guide can be found here: https://www.youtube.com/watch?v=eiH-QyHG83g
Get a backup copy of the Chrome OS on an SD card; for this use a Chrome App “Chromebook Recovery Utility”. Here’s a guide: https://www.groovypost.com/howto/use-chromebook-recovery-utility-troubleshooting/
I would be remiss not to mention that the next steps will void your warranty with Google. But hey, I figured this Chromebook would be dead after EOL anyway.
Now prepare to open the case of the C740 to replace the SSD drive. Others have done this: https://www.youtube.com/watch?v=qLA-yELRlL0 The case has 13 screws on the bottom. Remove all those and carefully pry open the case on the edges. The C740 is similar to the C720 so other youtube videos to opening the case apply: https://www.youtube.com/watch?v=-jOHHyJMgWk
It is also possible to remove the write protect screw, which is needed to overwrite the Chrome OS BIOS. Here’s a drawing of where you can find the screw.
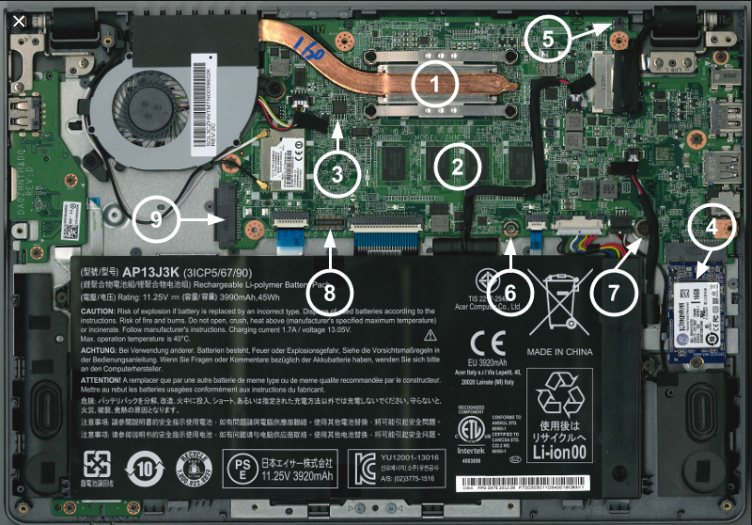
7 is the write protect screw and 4 is the SSD drive. Notice the huge battery.
With the SSD replaced and the write protect screw replaced, reassemble the C740 case.
Press the power button on the Chromebook with the power supply attached. Restore the Chrome OS with SD card used in the “Chromebook Recovery Utility” process. Put the SD card in the slot after the “Chrome OS is missing or damaged” message. The restoration process will take a few minutes and take up all the new 128GB SSD space.
Now comes the fun (and a little scary) part. Replace Chrome OS with something called SeaBIOS. For this turn to the great people at https://mrchromebox.tech
They have worked with hundreds of Chromebook models and figured out how to replace the Chrome OS on most of them.
I bravely loaded the mrchromebox utility by opening a terminal (Ctrl + Alt + T) entering the word shell and copy/pasted this command: cd; curl -LO https://mrchromebox.tech/firmware-util.sh && sudo bash firmware-util.sh
The resulting menu is a marvel of software engineering. It identifies your processor and model of chromebook and presents a menu of options. It looks something like this:
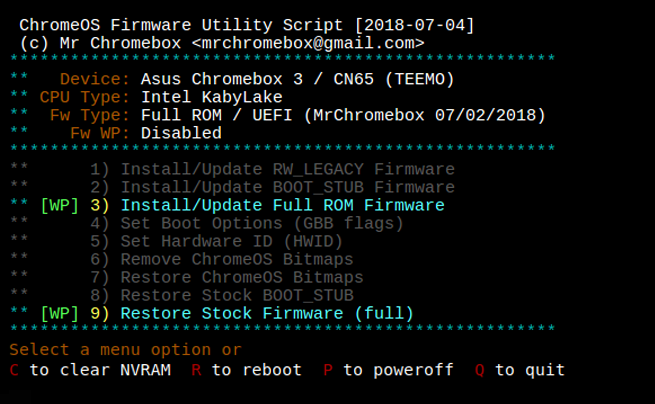
The Write Protect screw has been removed so you can actually overwrite the BIOS by choosing option 3.
I did experiment with the write protect screw in place first, but Chrome OS is jealous of any other partitions and operating systems. Upon recovery, the partition is overwritten and I was left with Chrome OS only.
So, in the end, I chose and completed option 3, Install/Update Full ROM Firmware, in effect converting the Chromebook to a laptop. It takes a few minutes for the process to take place.
After the conversion, a new operating system is needed. The new OS needs to create and recognize Unified Extensible Firmware Interface (UEFI) partitions. This takes part of the hard drive for storing the system configuration.
For my OS I chose the newest version of Linux Mint Cinnamon. I have been using various distributions of Linux for years, finally settling on Linux Mint as the best for everyday use. My reasons are plentiful as outlined in my articles on https://jansen-pcinfo.com/
The best way to install an operating system these days is via a formatted USB Stick that contains a live version of the OS. I looked at several videos, but it seems that Etcher is the best universal tool for creating a bootable USB image: https://www.youtube.com/watch?v=xb4fiFda4no&t=130s Instead of CentOS, I downloaded the Linux Mint 19.2 Cinnamon ISO from the Linux Mint website: https://linuxmint.com/download.php
With the Chromebook powered off, I insert the USB Stick and power on the Chromebook. After the BIOS screen which looks like this;

the only bootable device is recognized and starts the live mode of Linux Mint. With the live mode running, double click on the Install Linux Mint icon. Here’s a video for that: https://www.youtube.com/watch?v=c3UQ_vQL_Pw It is for Linux Mint 19.1, but close enough. Erase what’s on the SSD and install Linux Mint. Restart the laptop after Linux Mint is installed.
Success! My $50 Chromebook plus $25 SSD is now a Linux Mint Laptop. It is fast and reliable.
I don’t even know how I ended up here, but I thought this post was great. I don’t know who you are but definitely you are going to a famous blogger if you are not already 😉 Cheers!| а
High praise. Thank you for the kind words.
Martin Jansen
The root of your writing while appearing reasonable at first, did not settle properly with me after some time. Somewhere throughout the paragraphs you managed to make me a believer unfortunately just for a very short while. I however have got a problem with your leaps in logic and you might do nicely to fill in those gaps. When you actually can accomplish that, I could definitely be fascinated.
Criticism and praise both accepted.
I appreciate the effort put into this post.