
By Martin Jansen, Owner of Jansen-PCINFO
I am, by no means, a graphic artist or designer. Nonetheless, I find myself creating (hopefully) compelling graphics for each of the articles I write. This article discusses the creation of graphics using some simple and free tools. Let’s start with a discussion of the image types I use.
JPG vs PNG Images
Portable Network Graphics or PNG images are raster types (expandable without losing much definition) and are popular graphics with web designers because they can have transparent or semi-transparent backgrounds.
Joint Photographic Experts Group or JPG and JPEG, on the other hand, is popular with photographers. It compresses RAW images from cameras and is a format that loses definition when made larger.
I use JPGs as backgrounds and PNGs as foreground images.
Free Software
I like to use LibreOffice Draw for my image compilations. Google Drawings will also work, if you must work solely from the internet on Chromebook. Draw allows for bringing images into the foreground or background. Resizing images is easy.
When the image melding is complete, I use the screenshot program to capture a flattened image without losing too much definition.
A Short Tutorial
Let’s start by finding a nice JPG background. I like sparkly backgrounds. Do a google search from glitter background. I like this one:

You can borrow this one or find one of your own – just make sure it is lighter in color. The google search engine has an images category to help find your background. To borrow the image above, right click on the image and select save image as…
Save all images to your local pictures folder.
Now it’s time to search for a transparent PNG image depicting graphic design. I found this one at pngwing.com/en/free-png-bbeac. I’m not an artist, but I know what I like:

Now we will combine the images in Draw. Open a blank Draw file and from the menu select Insert, Image.
Insert your JPG background. Move the image so it takes up the top part of the screen, not beyond the borders.
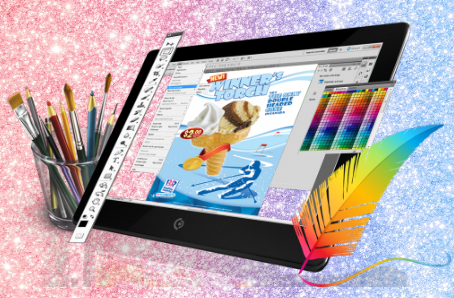
Next, insert the graphic design PNG image. Drag the image on top of the background and resize to fit. When finished, it should look like the image I captured at the top of this article.
Last step is to take the screenshot which captures both images in one PNG file or copies the image to the clipboard for pasting. Windows 11 has a Snip and Sketch program built in. Macs have some snip commands to capture images. Linux Mint has a program simply called Screenshot. Chromebooks also have a Screen capture program available from the settings menu. I draw a rectangle around the image I want to capture.
The resulting PNG file is less than 300 KB in size. Larger images take longer to resolve on the web.
Most of the images involve just one PNG and one JPG, but others are more complicated. This one for travel tips involved combining several PNGs on a JPG background:

This includes a nice likeness of the Prius I drive today.
Another more difficult image involved taking smaller PNG files to display a music factory:

So there you have it. It doesn’t take much of an artist or designer to create nice graphics – just a good eye for layout and placement.